Friday, November 6, 2009

Raw Printing From OS X - Zebra Network Printer

Here's a set of screenshots for setting up raw printing through OS X. This was especially useful for using the jZebra application for printing to a raw printer from a web page running on an OS X workstation. Tested Nov 6, 2009 on OS X 10.5 running CUPS 1.3.8.

  1. Load Safari or Firefox to http://localhost:631 and click The "Administration" tab, then "Add Printer"
    https://blogger.googleusercontent.com/img/b/R29vZ2xl/AVvXsEisCs7PQjHp8frWOfu5WSM9ZbvII9JIkyXq6pokr-clwUgPZYIk8OI-to3yggpbjL33EJAh9n7KCfZBMTBZ2sDPtVVWtz33BzU5j_s6Mw0U338Qx4NkvEt91clr8O5c3gZKXuApR_Awn6M/s400/Picture+1.png

  2. Type the name of your printer and click "Continue"
    https://blogger.googleusercontent.com/img/b/R29vZ2xl/AVvXsEh9pbes13oOEDmWjMgrrAavi5TekMMRsvX70YHeQyr92enbZrNBBrmXTd4OFSyigrngvZ9s10_hdvUGu1Zu_bnWy31p8WdddC3cJjJ-Qnck1gz7mgooaTIxofCgy9lzo5XVVUJkkSaGxo0/s400/Picture+2.png

  3. Be patient as the CUPS server responds to the new printer request


  4. For device, leave default "AppSocket/HP JetDirect" and click "Continue"
    https://blogger.googleusercontent.com/img/b/R29vZ2xl/AVvXsEhAPPA1qQOc9OWZFXDn5IlM8DDPlWpSXkshy25j-X4OODhukmYfp0Gvh01YNuFY5NUbMBvygaluPe-jcpKp7O4nU8W0GsHtaAb6FSQK7vWXoe0ZZAuijbwxchY0nbp0i_0Yoa58NBFNc7g/s400/Picture+4.png

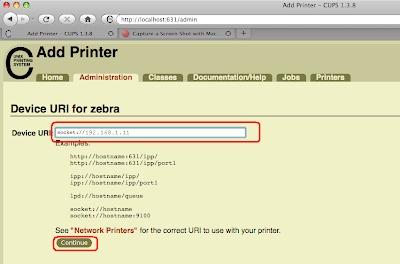
  5. For URI put the address of the network printer in format "socket://address:port". Port can be left blank if default (9100). Click "Continue"
    https://blogger.googleusercontent.com/img/b/R29vZ2xl/AVvXsEhfkZcCdZWG8dz6L8yAvOQA-4ew_ijR-1vzB-WjlhlaHkcgCAIfut8k8_ft9qjSu0ZGWKWJj3NtjacJUZmBqE3qagWTYtTLbdLEFqiKYa_l-ztxhv5J69vUMec-DxZas04VfjfoAdEAslg/s400/Picture+5.png

  6. For Make/Manufacturer, select "Raw" from the list of manufacturers and click "Continue"
    https://blogger.googleusercontent.com/img/b/R29vZ2xl/AVvXsEiKahNXMG4jFJC6B70QW_2vELCV5R0wMBXctziOC7Vb1nEFCwIxLABdaWxntI_C77WOdMBBze2qaS3Nb8NjweC_MpuyAQxmTMypRKMNA8LJyEaoXzwDR0EdSrUkpXLw9lfpJDovACAKThY/s400/Picture+6.png

  7. For "Model" click "Raw Queue (en)" which should be the only option in the drop-down menu. Click "Add Printer". Note: If prompted for a password, enter a username and password with administrative access on the Mac. You may be prompted twice.
    https://blogger.googleusercontent.com/img/b/R29vZ2xl/AVvXsEgFC0Bee9_IdJ5D5OnbMs0KOk5yFEtuHCpXoikitvf5sTOut81fdpXX5XByVKu-Ub0AGwaq3xZIMCYJ04PvGUFGZ1UqMKe_9mRFGAFPKQ0vdFNEj5Z33YNypuexcpMH7olHwSWVRIm5iXA/s400/Picture+7.png

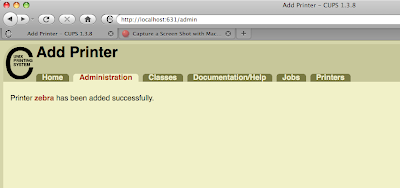
  8. Your printer has been added. You will see a message confirming this. Ignore Banners and Policies prompt. In the next steps, you will add a Printer Class for your new printer to show in OS X's Print Manager.
    https://blogger.googleusercontent.com/img/b/R29vZ2xl/AVvXsEj4tG09eDrp_8wlmEycSta7D1hijK3rS-q4h01YycHwohcindJAZWYJZNke3SIFTEuu941JJr0nCAhAXwWDw2Px2EUfEN1N_RdCcYPHkicAPi7D72ssMvUjuuvVbiEXowVZA1TFOh5pdY8/s400/Picture+8.png

  9. Click the "Administration" tab and click the "Add Class" button.
    https://blogger.googleusercontent.com/img/b/R29vZ2xl/AVvXsEga-UUP6kmZbwTenteawpD2vyexvL12dRJiIVLFRZImbNeqOPr0MUM93TfVVU_V_yd5OIhYo-f7mHNB1TXDkqdq_BVz1d2ANKxT924Dt59UUwsQheAOjoxDGvkw473oWfkdT9GJWqgs9as/s400/Picture+9.png

  10. Fill out "Name". This must not conflict with the printer name from Step 2. Fill out the "Description" with what you would like the printer listed as in OS X.
    https://blogger.googleusercontent.com/img/b/R29vZ2xl/AVvXsEgc13JIhS2JXdFo_ATKzEs_pv2O6qi4NLDlFMDdADIHBU9NalfuWcnhFYuATuux3iQdidDSjuA1Dtrq23x55nIW1qhnM44aQJpFVcVvTiGR9UbMY1zTUAcrRfsl3N0flLMMGTXu8SjUN7I/s400/Picture+10.png

  11. Your printer class has been added. You will see a message confirming this.
    https://blogger.googleusercontent.com/img/b/R29vZ2xl/AVvXsEieU7xTkWA4zU1LmRPf8qr_rPEJ_ypGcZhTi5vuszV-k3Z5urDkRE-962hzFcyNJInvosEc8AIqbP3xVYKs-m5ibM-bGMc2wv_ZC_7GKNaZgWScgVXCZKmsNhuMMvROUtDeAVRWEG23tkY/s400/Picture+11.png

  12. Navigate to "System Preferences" --> "Print and Fax", and your new raw printer should appear.
    https://blogger.googleusercontent.com/img/b/R29vZ2xl/AVvXsEioz6F-Oyi4fQJkvJisba6m2XV3jTtpTEdG8ZF6noFq8RCm4CfMDgbTYR1HTukxtBuJloqQ18gEEbKT_RTuxV-478DScMT2lXcdkQcjqw6o7n1gN2zT6GFEKcEOoA5HxwdZkAX8g5h7fzY/s400/Picture+12.png

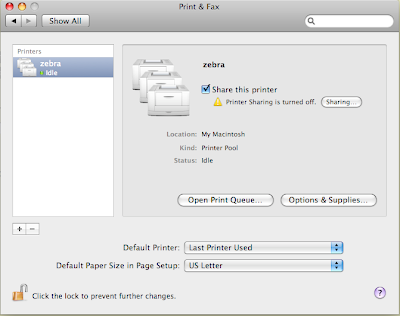
  13. Your applications should now be able to print to the Zebra printer as a raw printing device.


  14. End of Steps


-Tres

No comments: